Description
Filter Plus is a WordPress/WooCommerce Product Filtering plugin that allows you to build a powerful filtering
system for your site. With this plugin, your customers can filter your products/posts by any criteria –
Categories, Attributes, Characteristics, Tags, Prices, Stock, and Taxonomy. Each filter criteria is
configurable, giving you maximum control over what your customers are filtering and the results they see.
Key Features:
- Filter Any WordPress Post type: Select any post type you want to filter.
- Unlimited filter combinations: Create as many filters as required using the desired filter
settings and Filter criteria. - Filters WooCommerce products and Smart filtering by variations: Create filters for your
WooCommerce based store so that your customers can filter by any and all criteria and find exactly what
they’re looking for - Filters by Any WordPress parameters/meta keys: Filter by Price, Sale price, or any numeric value
from Custom Fields, Product rating Product Category, Tag, or Any custom Product Taxonomy or anything you
want and put into Taxonomy or Custom Field in WordPress - Arbitrary filters order in URL: For example: /color-blue/size-large/ or /size-large/color-blue/
- Clean, pretty URLs and Permalinks: Allows smooth indexing of them by Search Engines, share, bookmark,
and so on. - Filtering Inputs: Supports Checkboxes|Radio buttons|Labels list|Dropdown|Range
- AJAX ready: Filter with or without AJAX (without page reload/redirect). The plugin is ready to
load results using AJAX. - Separate Sorting dropdown with unlimited sorting options: Sort the results using the sorting
widget by any parameter. You can create the desired sorting parameter inside the widgets setting. - Tons of Settings: To set URL prefixes – order and values, Indexed Filters, Color scheme, Smart
scroll, Layout and behavior customizations, etc. - Responsive with mobiles and tabs: The plugin is mobile-ready. Mobile devices settings are there
to make the filters mobile responsive. Popups and collapsible options are also available. - SEO Rules options: Make specific filtering pages available for indexing, Post type, Filters
combination (Archive page + Filters). Set the SEO title, Meta description, H1 Title, and SEO Description
(SEO text for specific filtering page). - Translation/Localization: The *.pot file is available inside the plugin which allows you to
translate it into any language. - Compatible with any theme design: Select the filter’s primary color from the plugin’s settings
and the filters will look compatible with your theme.
How To Install
- Download the .zip file from your codecanyon account.
-
Go to: WordPress Admin > Plugins > Add New and Upload Plugin with the
file you downloaded with the Choose File button. - Install Now and Activate the plugin.
Frontend
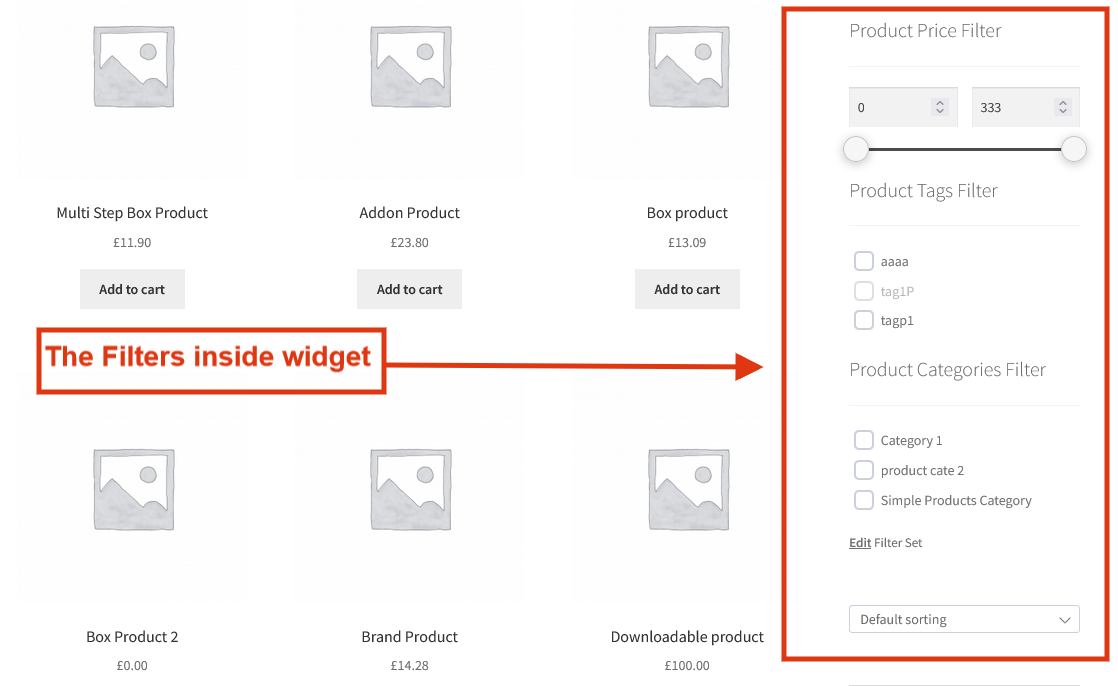
On the frontend, the filter work along with the widgets. There are three widgets in the plugin namely Filters
Widget, Chips Widget, and Sorting Widget.
The Filters are shown using the Filters Widget. The Chips widget shows the currently selected filter criteria in
the form of chips. The Sorting widget is used to sort the posts using any custom key.
Mobile devices
The problem with using filters on mobile devices, particularly on smartphones, is the placement of a widget with
filters. It will take up too much space and move the grid down if you place it above the products grid. If you
place it under the products, then it will be inconvenient to scroll the page to the filter widget every time.
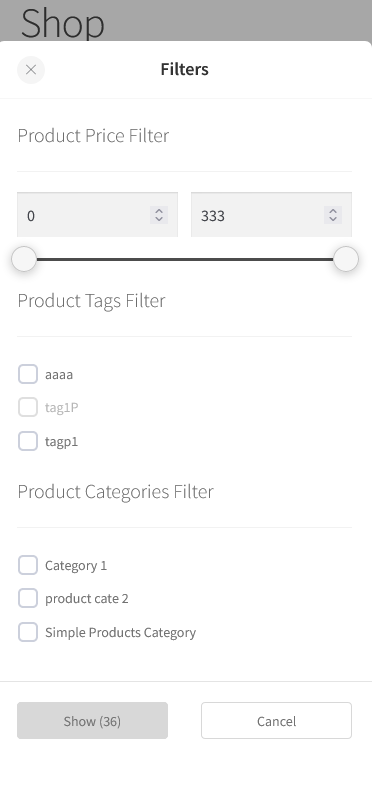
The solution is aPop-up Filter widget.
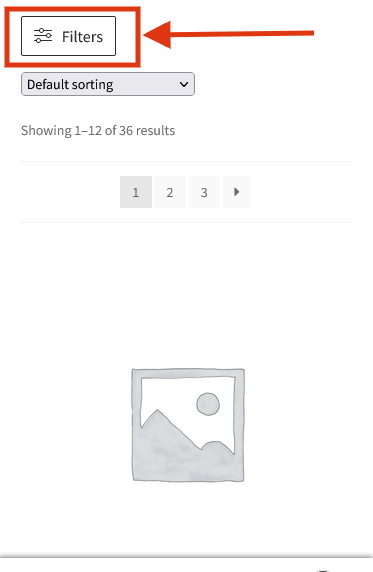
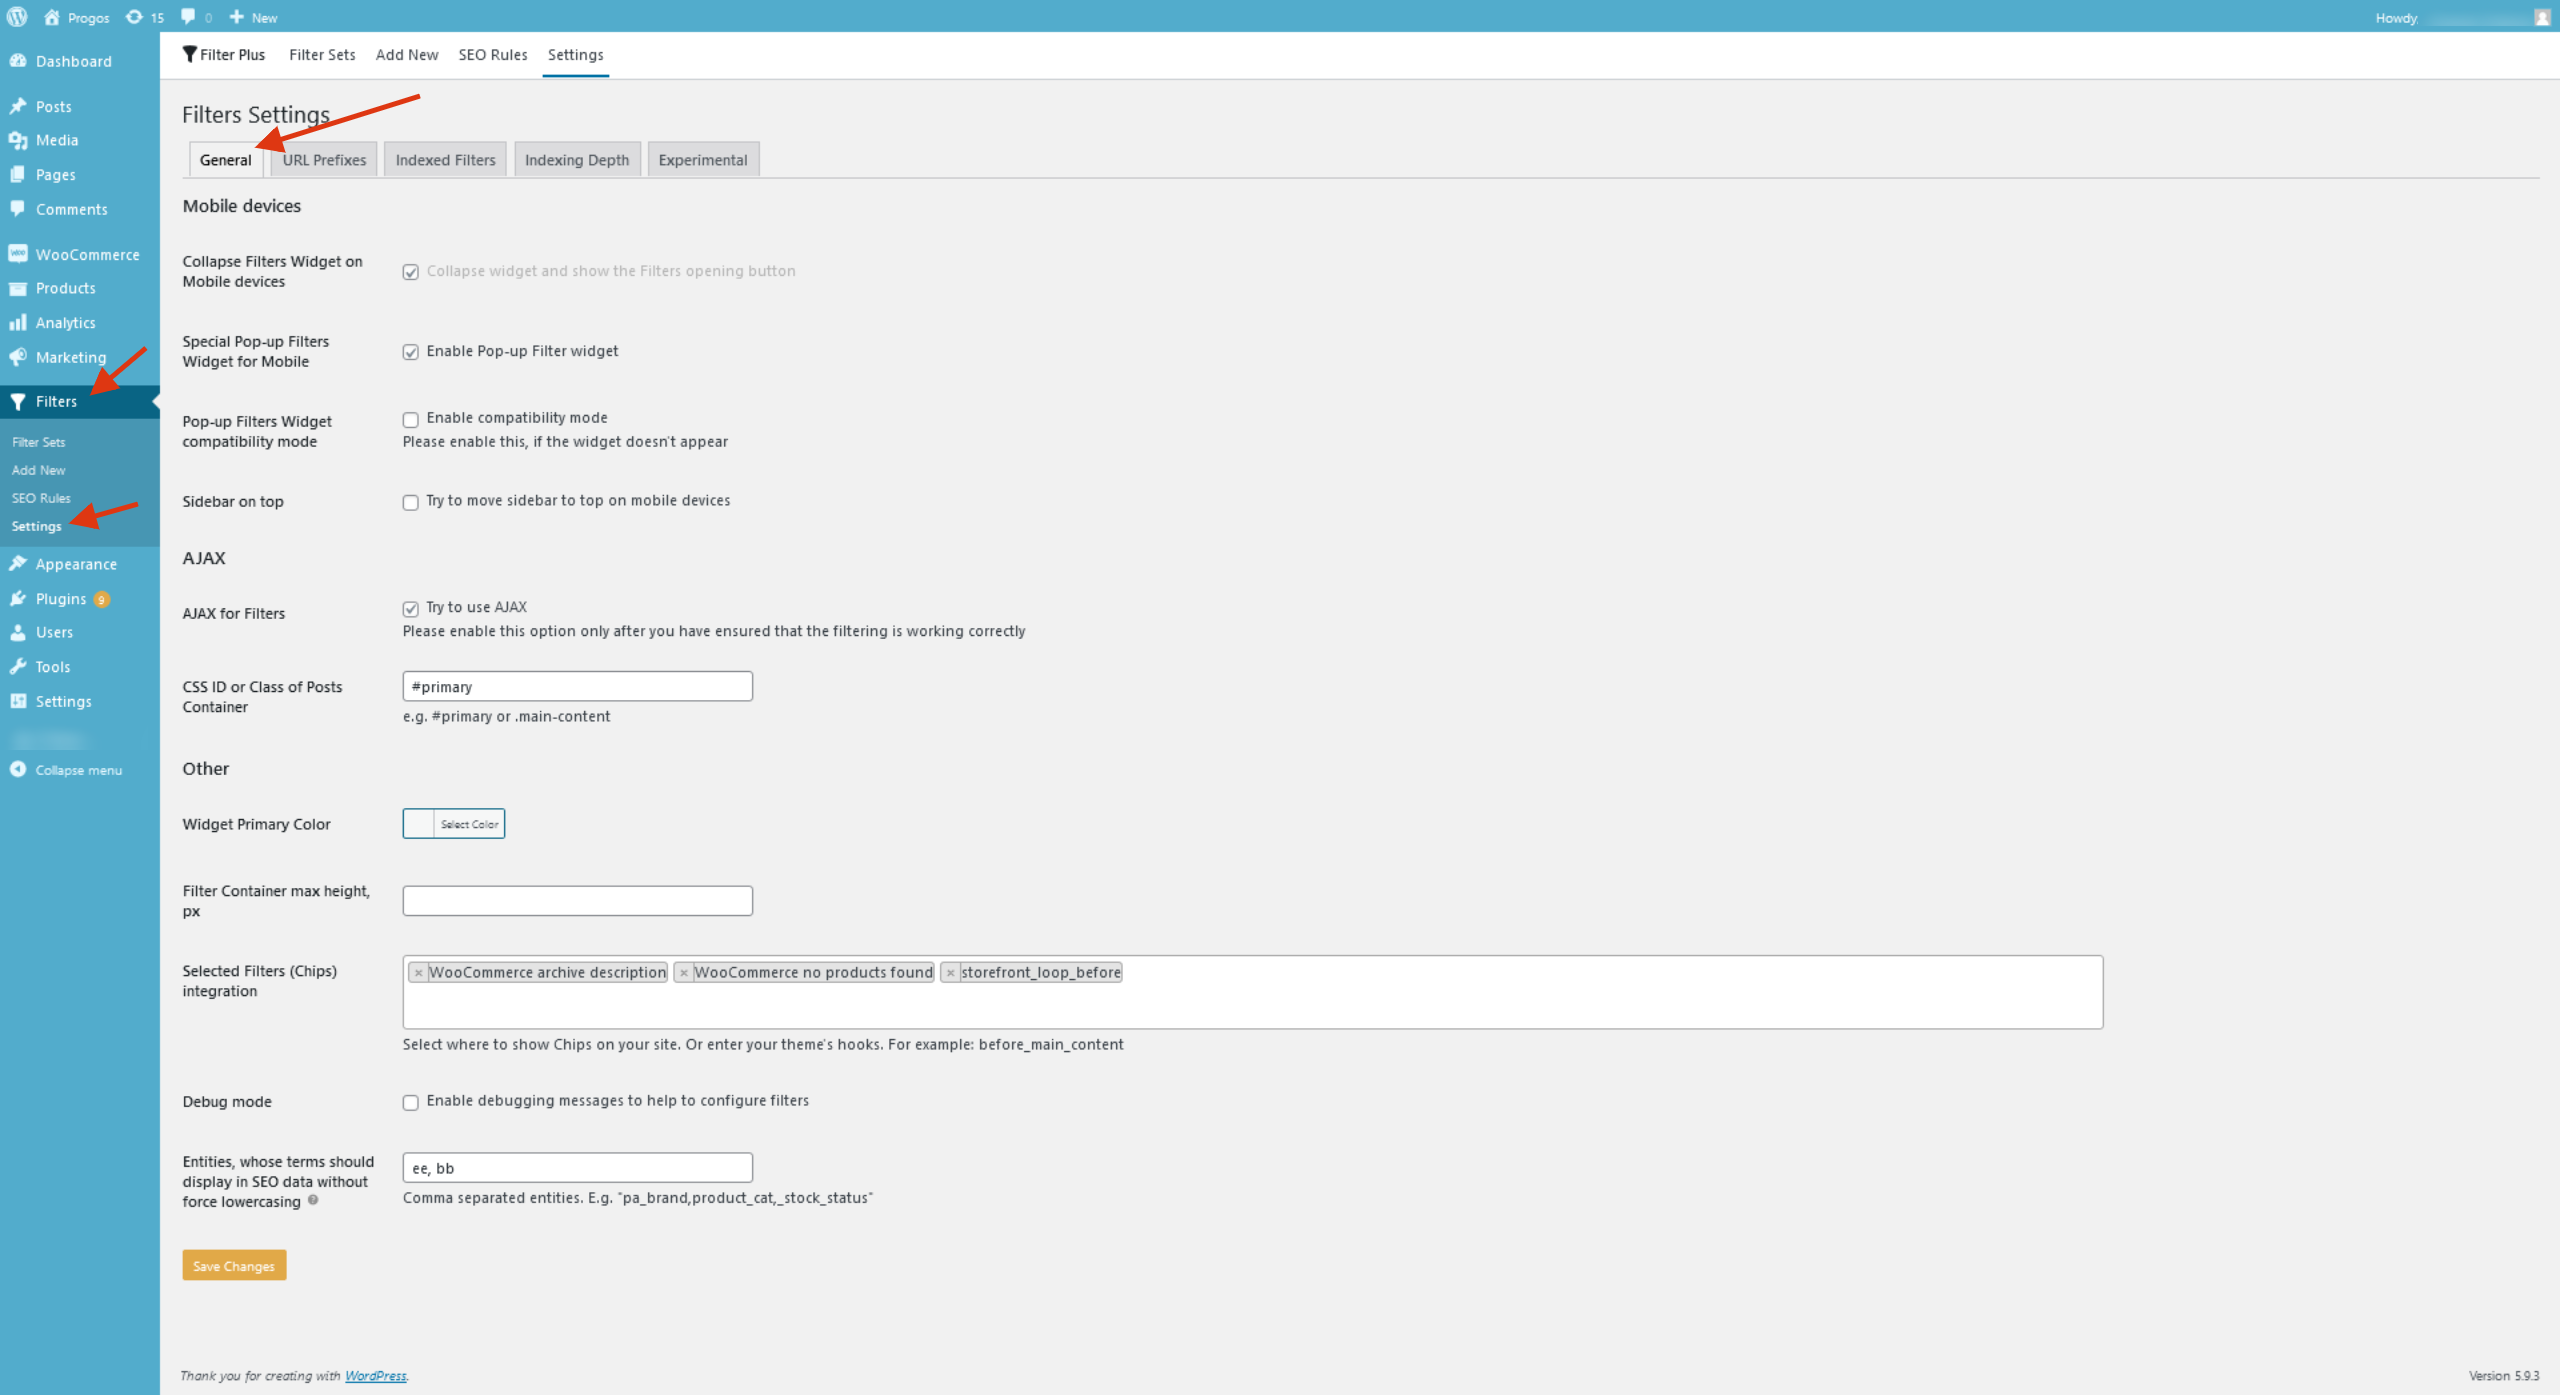
To enable the Filters pop-up widget, you need to go to Filters > Settings and activate the “Special Pop-up
Filters Widget for Mobile ” option and save settings. After that, the Filters button should appear above the
products list and will be
visible on smartphones. Click on the button will open the Pop-up Filters widget.
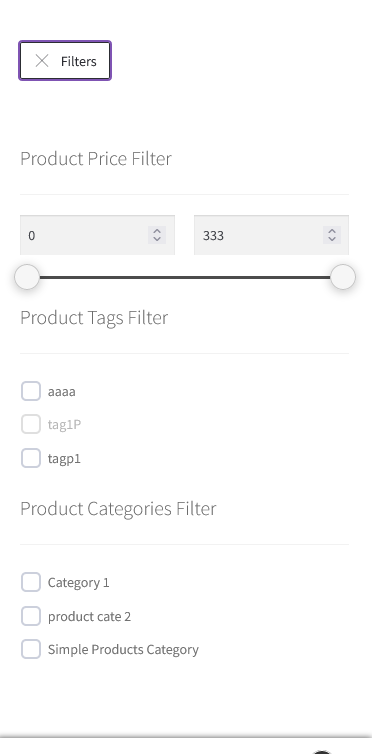
An alternate is to use the Collapsible Filter Widget option.
To use unfolding of the Filter widget, enable the “Collapse Filters Widget on Mobile devices”
option in Filters > Settings. After that, the Filters button should appear in the place where the Filters widget
is displayed, and be visible on smartphones only.
If the sidebar with Filters is displayed under the products list, try enabling the “Sidebar on top” option in
Filters > Settings. If that doesn’t help, please ask your site’s webmaster to help you.
Shortocodes
The Filter Plus plugin has four shortcodes that allow you to display the Filters widget, Selected
Filters (Chips), Sorting Widget, and the Button that opens the Filters widget on mobile devices.
Filters widget
[fp_widget] – allows you to display the Filters widget wherever shortcodes are supported on your WordPress site
– in posts content, page content, widgets, in text blocks created with page builders, etc. Shortcode arguments
allow you to change the widget properties.
Example: [fp_widget title="The title" id="10" show_selected="yes" show_count="yes"]
- title → widget title. Optional.
- id → Filter Set ID you want to display. Note that this Filter Set must be located on this
page. Optional. If you do not specify, the widget with the highest priority will be displayed according to its
order determined by the Order # parameter in the Filter Set. - show_selected → determines whether to display the selected terms (chips) at the top of the widget.
Disabled by default. - show_count → determines whether to display the number of found posts at the top of the widget.
Disabled by default.
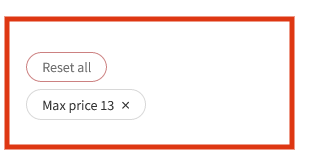
Selected Filters (Chips)
[fp_chips] – displays a list of selected terms and the “Reset all” button.
Example: [fp_chips id="16" mobile="no" reset="yes"]
- id → the ID of the Filter Set whose selected terms you want to display. Optional parameter. If not
specified, all selected terms of all Filter Widgets on the page will be displayed by default. Of course, the
specified term must correspond to the Filter Set, which is located on this page. - mobile → determines whether to display chips on mobile devices. By default, chips are hidden on
mobile devices. - reset → allows you to turn off the “Reset all” button and not display it. The button is displayed by
default.
Sorting Widget
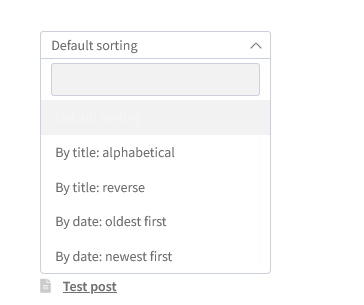
[fp_sort] – allows you to display Sorting Widget in desired places, where regular WordPress widgets are not
available.
Example: [fe_sort id="2"]
- id → ID of the Sorting Widget.
Filters open button, for the mobile devices
[fp_open_button] – displays the Filters opening button on mobile devices. The button works with both Filters
widget types: the Pop-up Filter widget and collapsible Filter widget whose behavior is depending on the plugin
settings.
Example: [fp_open_button id="7"]
- id → determines which Filter Set to open. Optional parameter. By default, the button will open Filter
Set with the highest priority if there are several of them on the page.
Backend Settings
Lets now explore the backend of the three widgets one by one:
Filters Widget
The Filters widget is used to display all filters of the Filter Set that matches a particular page. If no Filter
Set is configured for the page, the widget does not display anything. This was done so that you do not have to
separately disable the widget on pages where filtering is not needed.
The following conditions must be met to display the Filter Widget:
- The Filter Widget was placed in the sidebar or widget area on the page where you need filtering.
- Value of the “Where to filter?” field in a Filter Set corresponding to the page where you want to display it.
- The Post type specified for the Filter Set matched the Post type of the page or selected WP Query.
- The sidebar or widget area, where you placed the Filter widget is not hidden by default (requires a click to
become opened). Sometimes this happens on mobile devices. - If you have the “Hide empty Filters” checkbox enabled at least one filter term in this Filter Set contained
at least one post
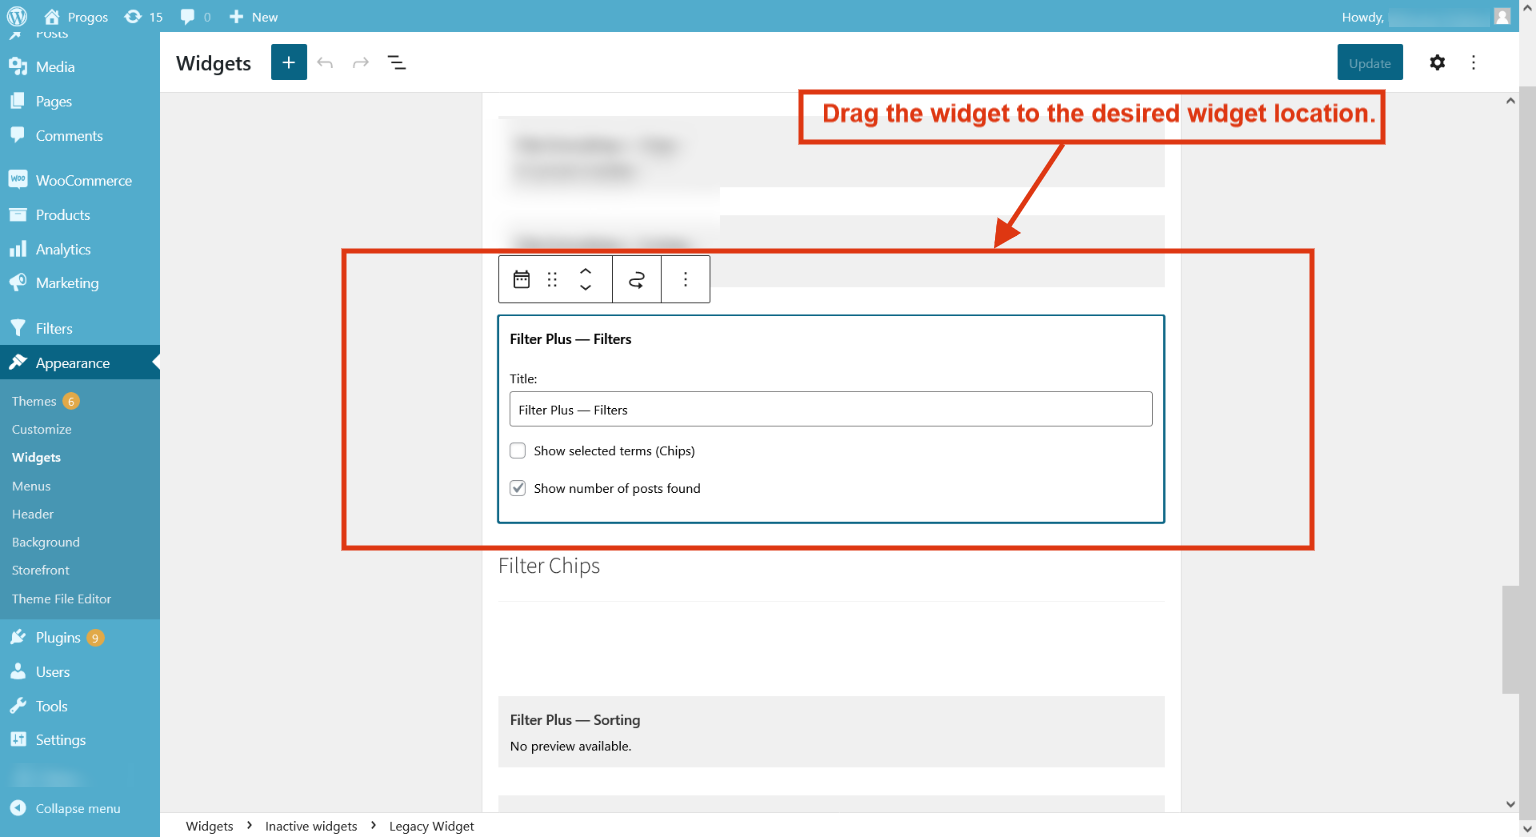
To display Filters on your site just add the Filter Plus widget to the Sidebar or Widget area you need. To
do this go to Appearance > Widgets and drag the widget called “Filter Plus — Filters” to the Sidebar that
interests
you.
Chips Widget
The Chips widget will show the selected filter attributes as well as a reset button to remove all of the
selections.
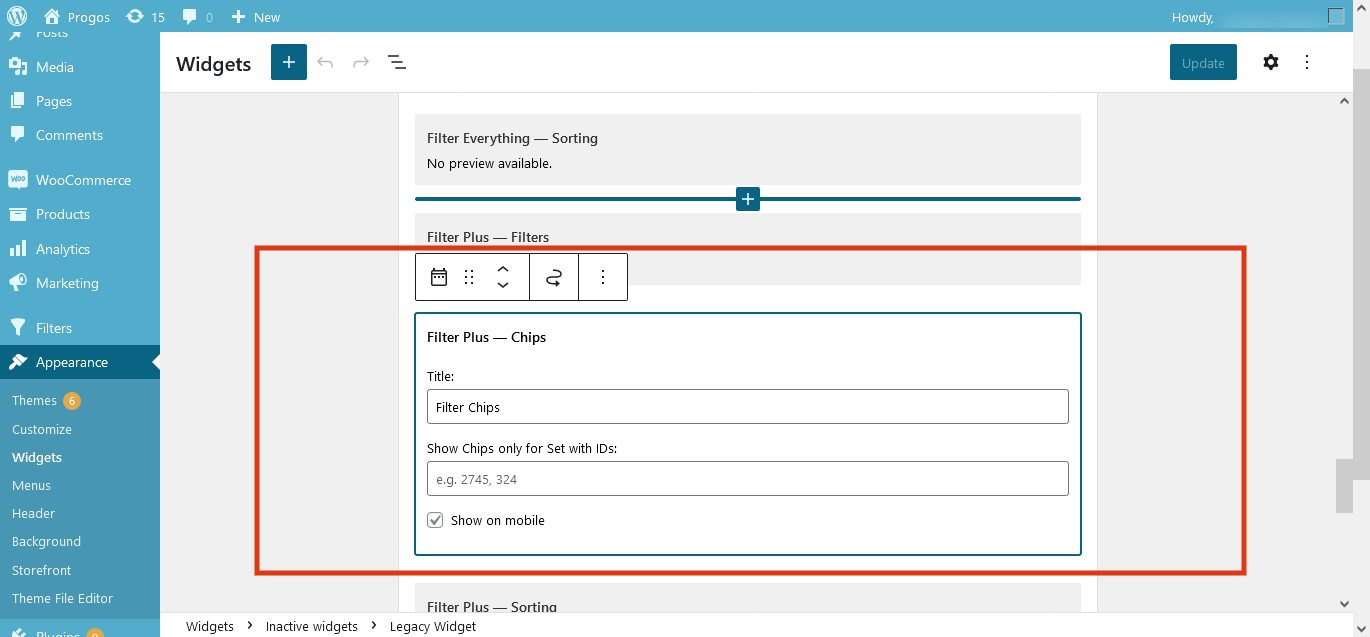
To display Filters on your site just add the Filter Plus widget to the Sidebar or Widget area you need. To
do this go to Appearance > Widgets and drag the widget called “Filter Plus — Chips” to the Sidebar that
interests
you.
Sorting Widget
Filter Plus plugin contains the Sorting Widget that allows you to sort filtered posts or products in fact by any
criteria. It supports the list of all post-related criteria and Meta key or Meta key numeric.
To display Filters on your site just add the Filter Plus widget to the Sidebar or Widget area you need. To
do this go to Appearance > Widgets and drag the widget called “Filter Plus — Sorting” to the Sidebar that
interests
you.
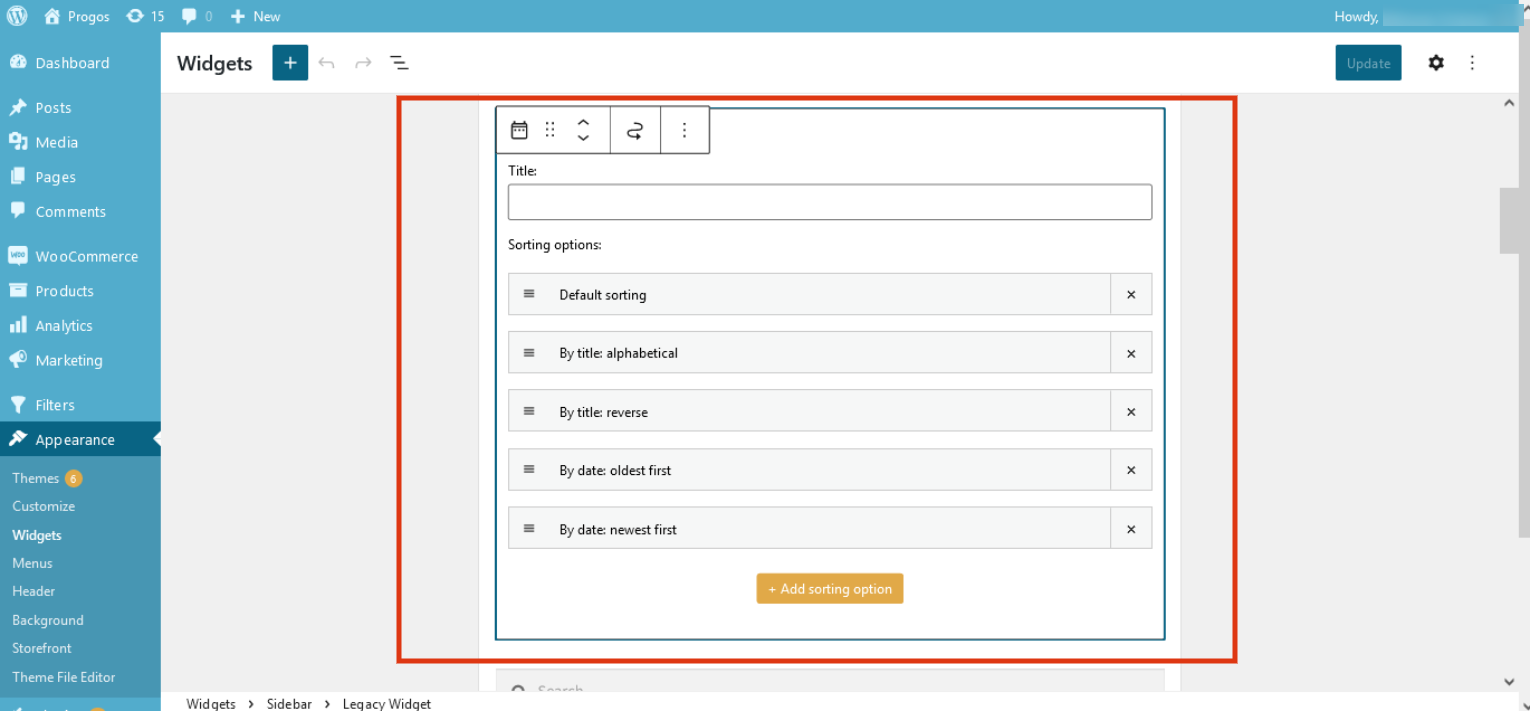
In the widget settings form you can edit or add new sorting options using the button “+ Add sorting option“. Also,
you can change the order of the sorting options by dragging them up and down.
In addition, you can use the Sorting Widget shortcode to insert the Sorting dropdown in the place, where regular
WordPress widgets are not supported.
When you install the plugin, then a new menu with the title “Filters” will appear in the admin
dashboard. This menu has four tabs.
- Filter Sets → List of all of the Filter Sets.
- Add New → Add a new Filter Set.
- SEO Rules → List of SEO Rules.
- Settings → To configure behavior of the filters.
Filter Sets
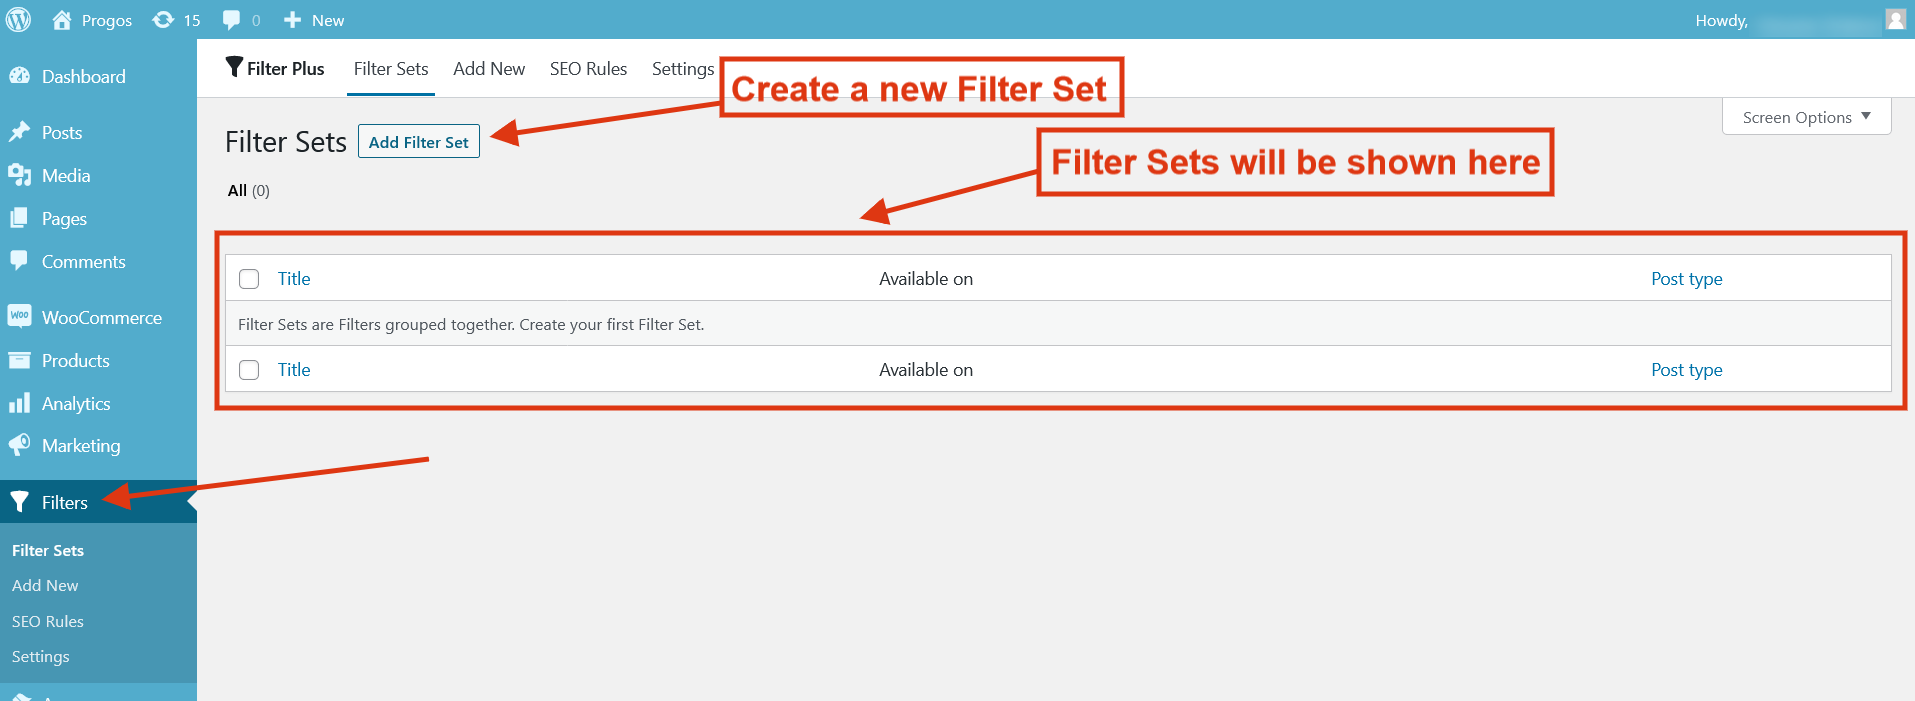
Filter Set is a group of Filters. Such organization allows you conveniently
change settings common to all filters in the Set. For example, specify pages where they will be located and the
Post type they will filter. The Filter Sets created will be shown here. To create a new Filter Set, click on Add
Filter Set button:
Create a Filter Set
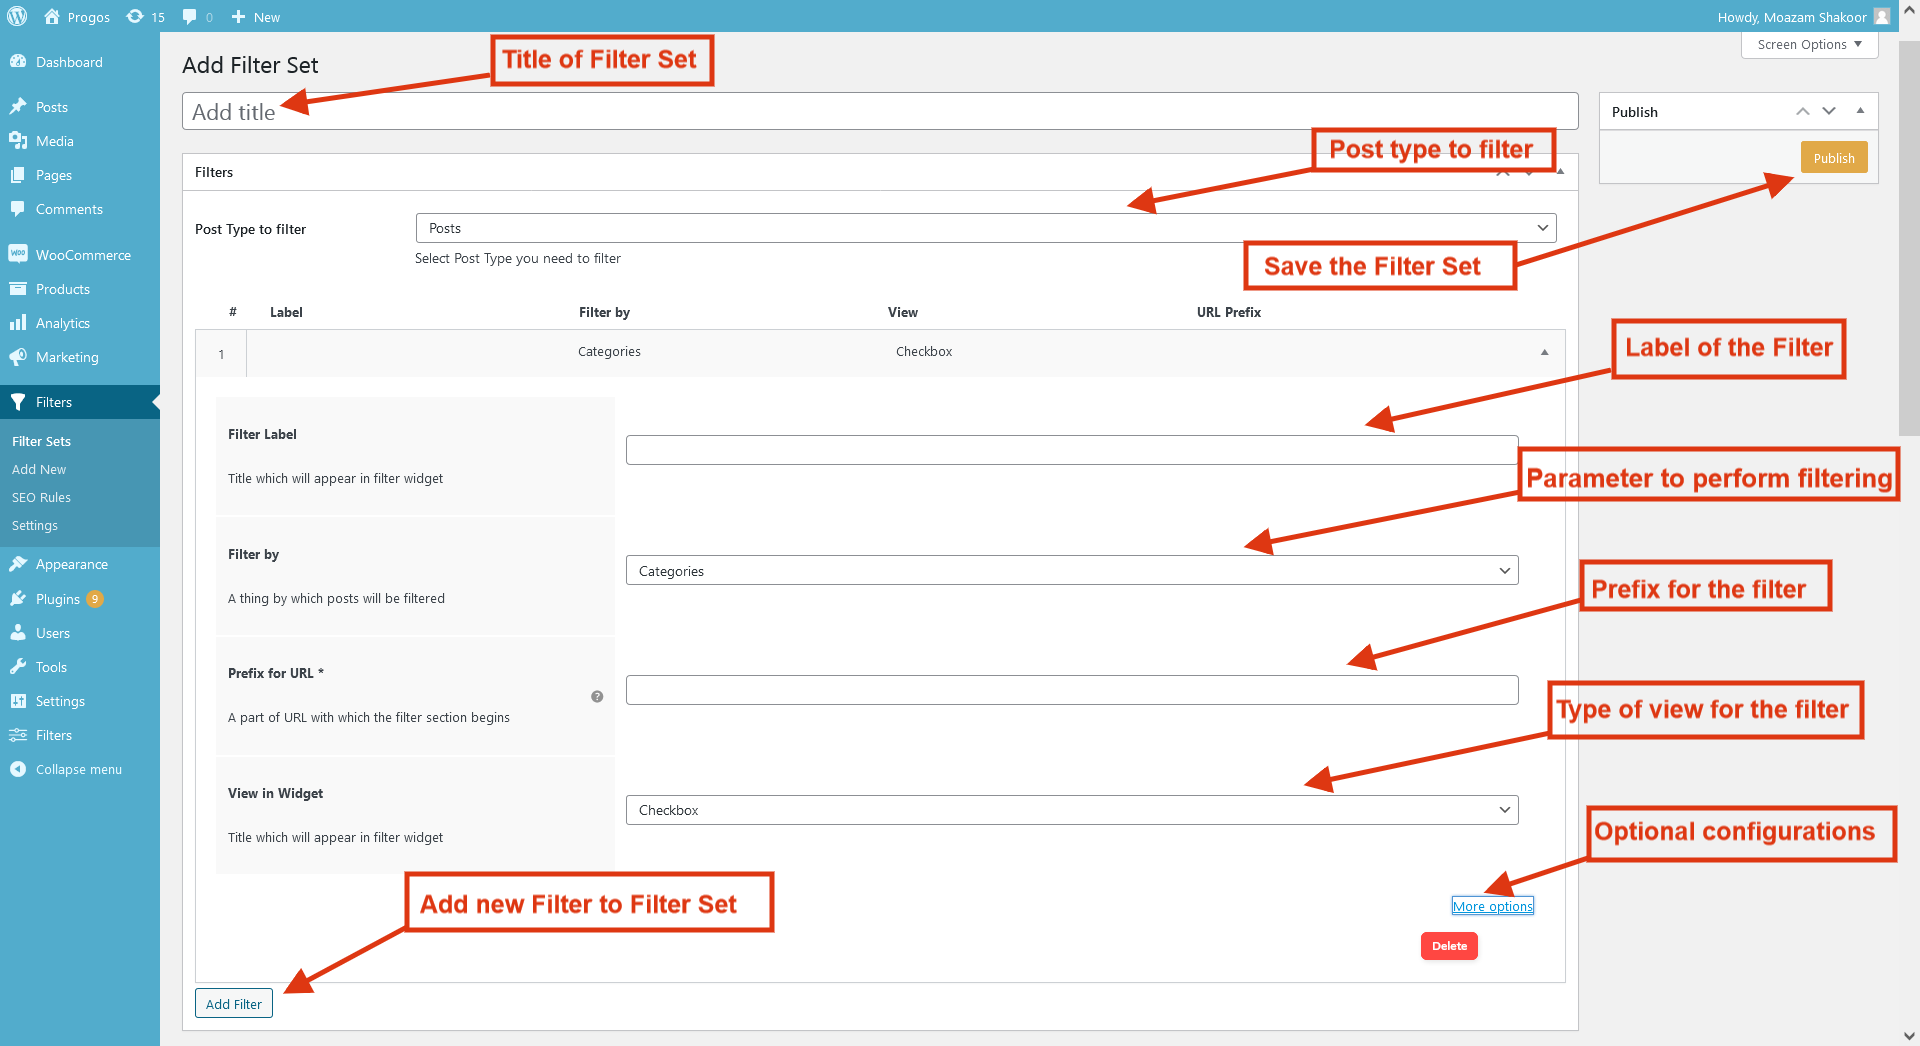
Let’s now create a Filter Set. In the images below, we will create a new Filter by clicking on the “Add Filter”
button. The Filter is the parameter by which posts are filtered. For example, it can be a product
category, price, product attribute, or any other criterion by which you can combine posts. In addition, the
filter also contains a number of other parameters that determine its properties such as behavior, look,
filtering logic, and others. Filters can be Taxonomies, Custom Fields and Author, so you can filter WooCommerce
products or WordPress posts
by almost any parameter!
For more options, click on the “More options” button and you can set the following options:
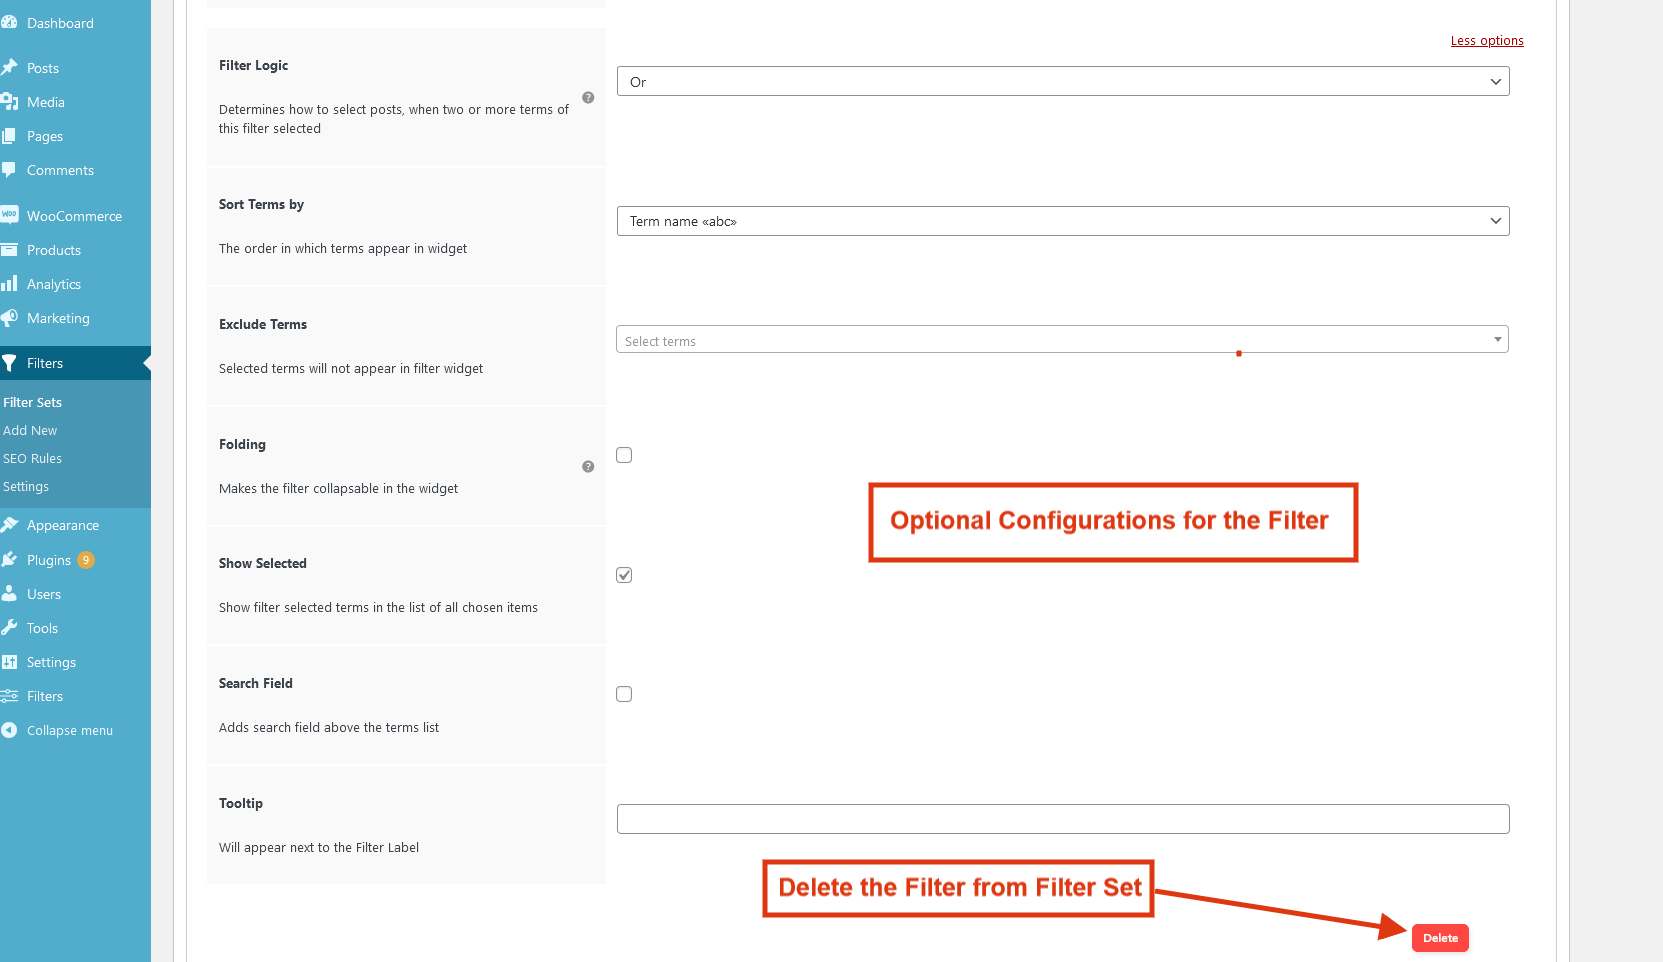
- Title → The name of the Filter. It is displayed in the filter widget. Optional.
- Filter by → Criterion by which posts will be filtered. It can be anything related to Taxonomy, Custom
Field, or Author in WordPress. Required. - Meta Key → Name of the Custom field by which posts will be filtered if you select one of the Custom
Field filtering options. - Prefix for URL → Determines which word or symbols will be contained in the part of the URL that
is correspondent to this Filter. It’s something like WordPress slug. Supports alphabetic symbols, hyphens,
underscores, and numbers. Required. - View in Widget → Specifies the view of the filter in the Filters widget. Possible values are: Checkboxes,
Radio Buttons, Labels list, Dropdown, Range - Filter Logic → Filtering logic. Possible values are “OR”, and “AND”. “OR” means to show posts that are
present in at least one of the selected terms. “AND” means to display only those posts that are present in
all selected terms at the same time. - Sort Terms by → Determines criteria by what to sort terms in the Filters widget and the order of this
sorting – descending or ascending. - Exclude Terms → Allows to specify which terms should be excluded from the Filters widget.
- Folding → Determines whether to collapse or not a Filter in the widget. If enabled, then the filter
terms will be hidden in the widget until the user clicks the Filter opening icon. - Show Selected → Determines whether to display the selected terms in the general list of selected
terms. Enabled by default. - Use for Variations → Determines how to filter variable products – by the properties of their
variations or their parent products. - Show Hierarchy → Determines whether to show the hierarchy of terms in the Filter. If enabled, child
terms will be hidden in the collapsible list by default. Disabled by default. - Search field → Adds a search field above terms listed in the Filters Widget and provides a quick search
among them. - Enable Range Slider? → Determines whether to display the Range slider for the “Range” view in the Filters
widget. - Slider Step → Determines the step with which to change the Range slider value. Can be a number, optionally
with a fractional part. The default value is 1. - Tooltip → Short explanation for a Filter that appears in the Filter title. Useful for situations,
when filtering criteria are not obvious and require additional explanation
Additional Filter fields
After the Filter is configured, create more filters by clicking on the “Add Filter” button if required. Now set
the desired options for the Filter Set and save the Filter Set by publishing the post:
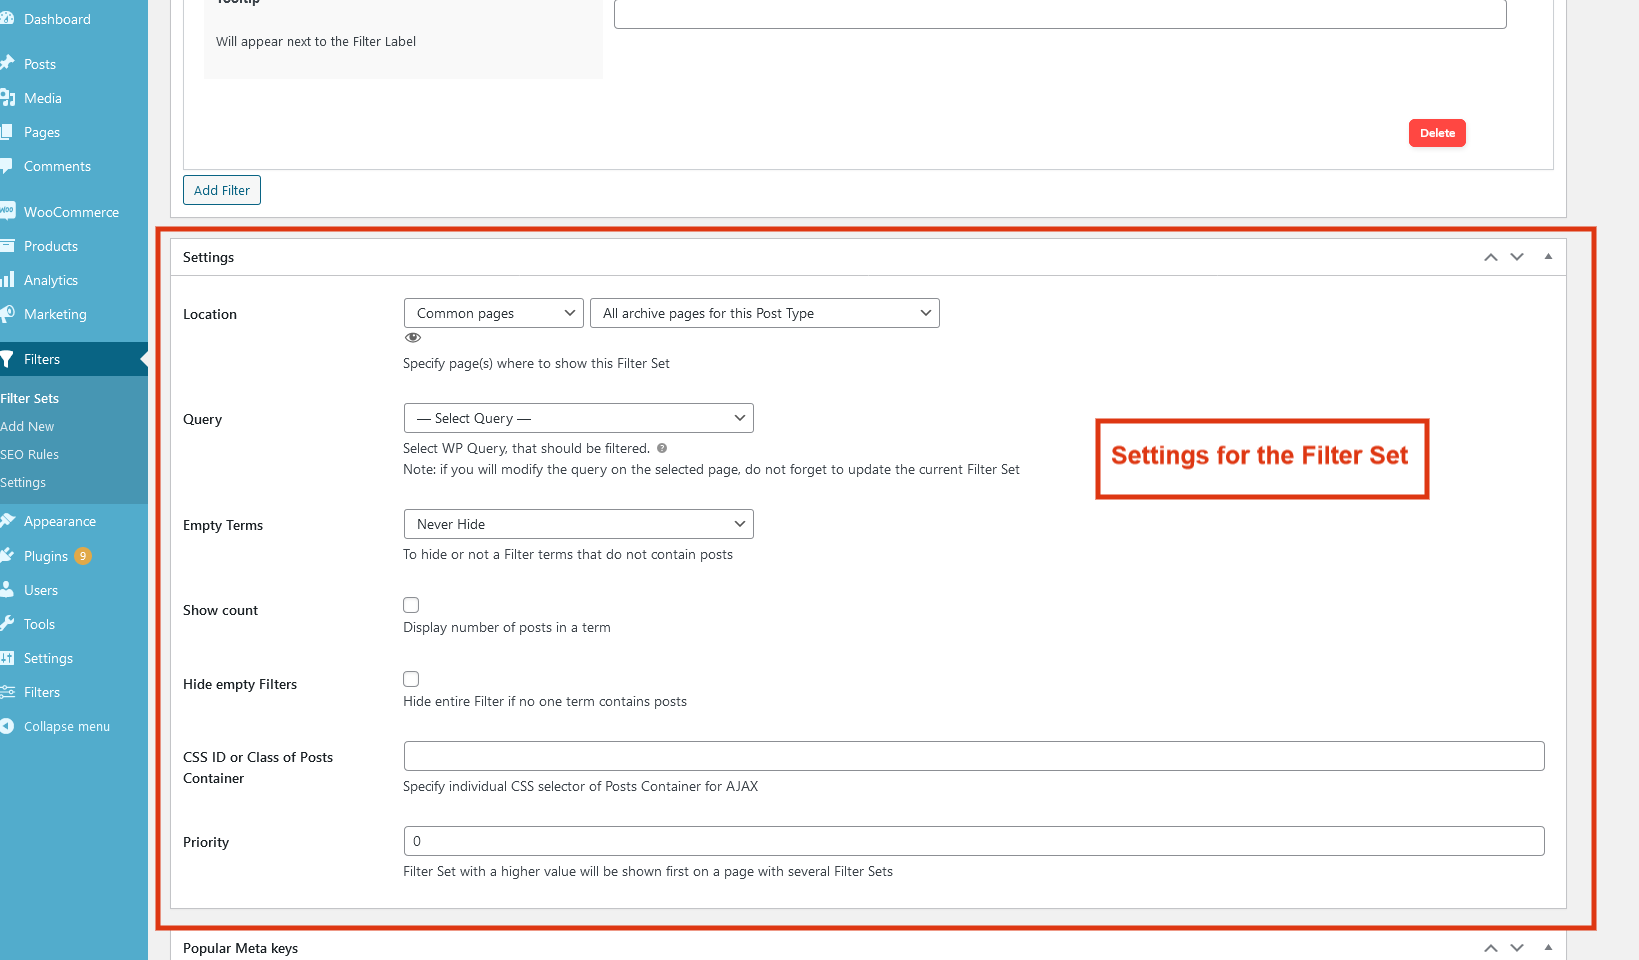
- Title → The name of the Filter Set. Used only in the WordPress Admin Panel and is not displayed on
site
pages. - Post type → Determines Post type for posts that will be filtered. For example, for WooCommerce
products, you need
to select Post type “Products”. - Location → Defines a page where this Filter Set will be applied.
- WP Query → Determines what WP Query on the selected page will be filtered. This allows you to filter
not only
the default WP Query (Main query), but also any custom one. - Empty Terms → Defines whether or not to hide in the filtering widget terms that do not contain posts
at all. - Show count → Determines whether to display the number of posts in the term. Enabled by default.
- Hide empty Filters → Determines whether to hide the entire Filter from the widget if none of its
terms contain posts. - CSS ID or Class of Posts Container → Allows you to specify an individual posts container selector for
correct AJAX filtering for this
Filter Set. - Priority → Allows you to set the priority for the filter set. This option is useful on pages where
you need to
use multiple filter sets and the order in which they appear depends on the given priority.
SEO Rules
SEO Rule is a set of parameters that determine what pages among the filtering results pages should be
available for indexing by Search Engines. It also determines what values of SEO parameters should be
generated on these pages.
All filter results pages are closed from indexing by Search Engines. By creating an SEO Rule, you
will allow to indexing of all filtering results pages that match this Rule.
To create an SEO rule, go to Filters > SEO Rules > Add SEO Rule in the WordPress Admin Panel, fill in the
required
fields, and save the Rule. Notice: SEO Rules don’t work if your site is closed from indexing at all!
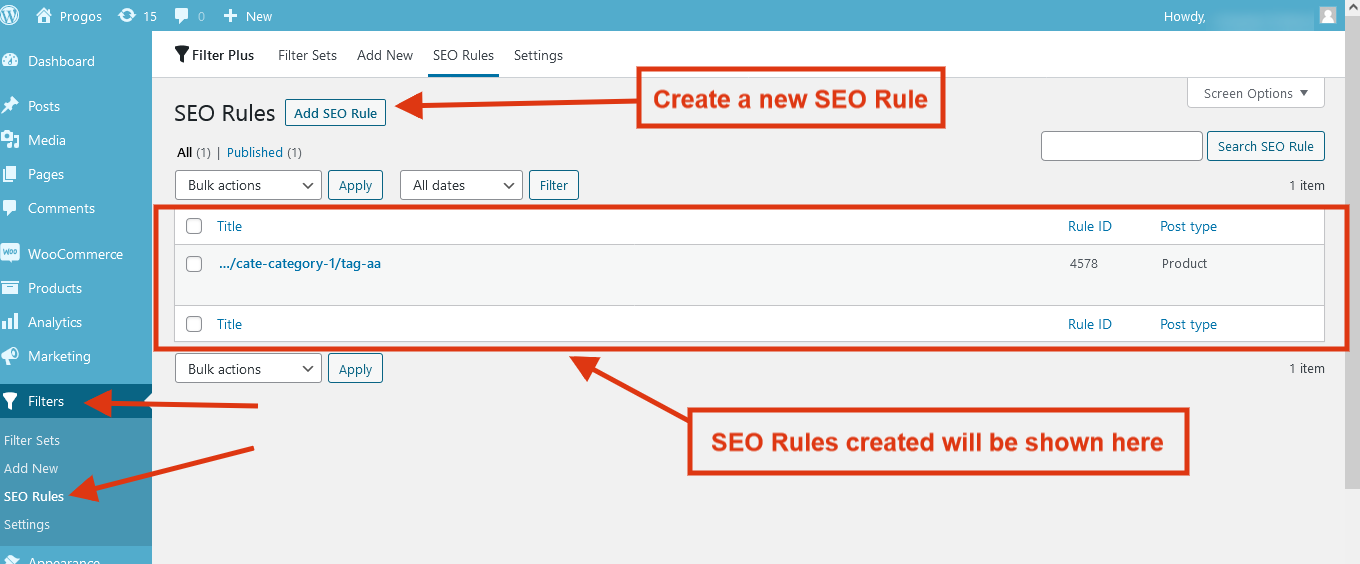
Create an SEO Rule
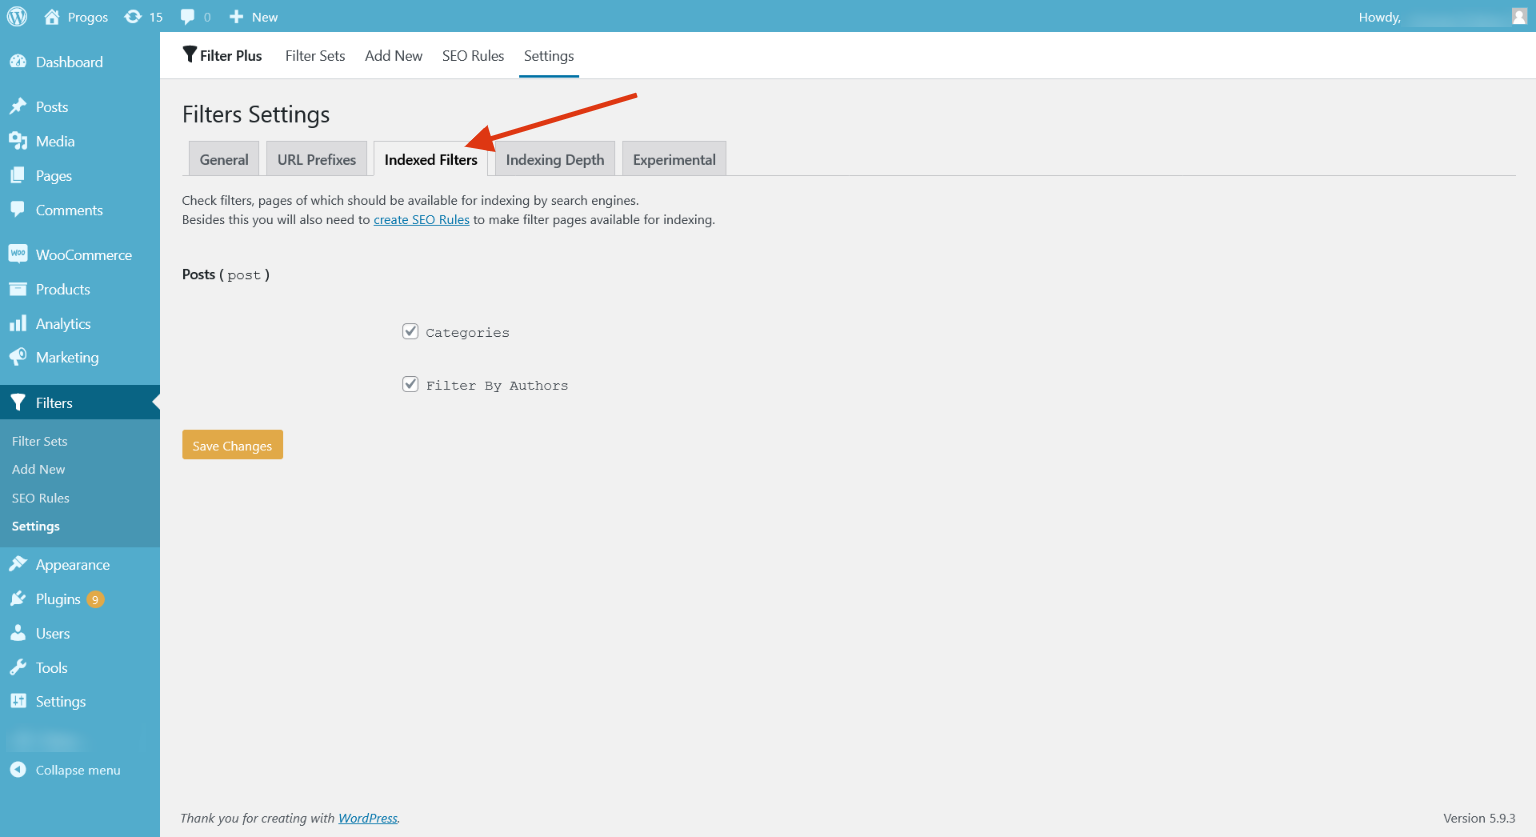
Only those Post types for which there are Filters activated for indexing are available. You can
specify which Filters are available for indexing in Filters > Settings > Indexed Filters by marking appropriate
checkboxes. Now let’s create an SEO Rule.
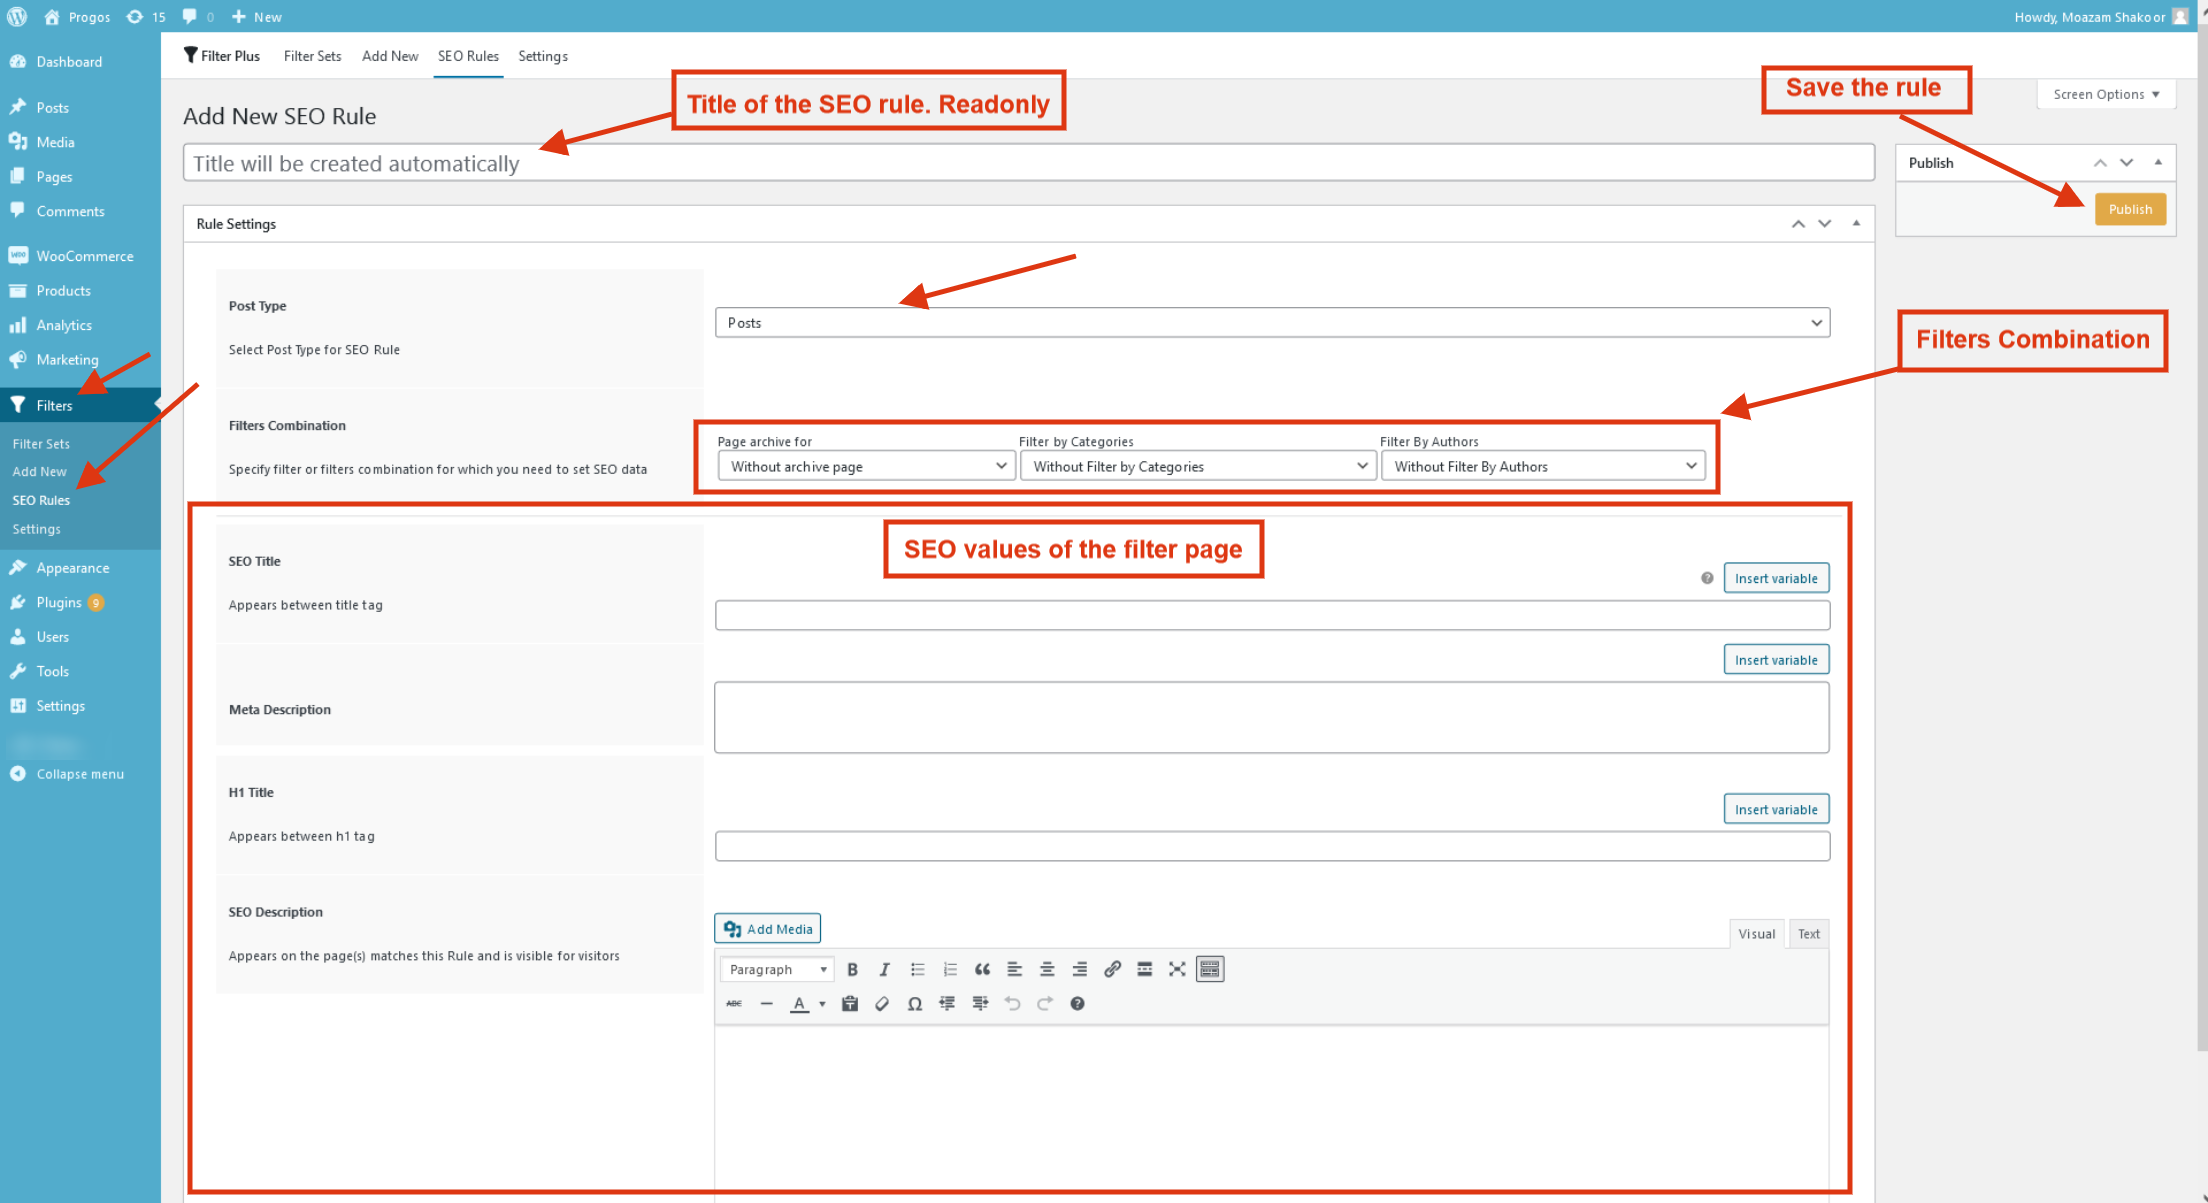
Set the desired values and save the rule.
- Post type → Specifies the Post type to posts to which the Rule will be applied.
- Filters Combination → Determines filtering results page that matches this SEO Rule. This will be a
page that contains all the specified filters at once. - SEO Title → The contents of this field will be displayed between the <title> … </title> tags on the
pages that match the SEO Rule. - Meta Description → Determines value of the content attribute of meta description tag on pages that matched
the SEO Rule. - H1 Title → Determines value for H1 tag on pages that matched the SEO Rule.
- SEO Description → Text from this field will be present on pages that matched the SEO Rule. This text will
be visible to visitors. - SEO Rule title → Schematic URL of filtering results pages that matches this Rule. Filled in
automatically.
Settings
There are tons of options available to change the behavior/appearance of the Filters. Let’s explore the five tabs
of settings one by one.
General
In the general tab, there are options for the appearance and behavior of the filters on the forntend.
URL Prefixes
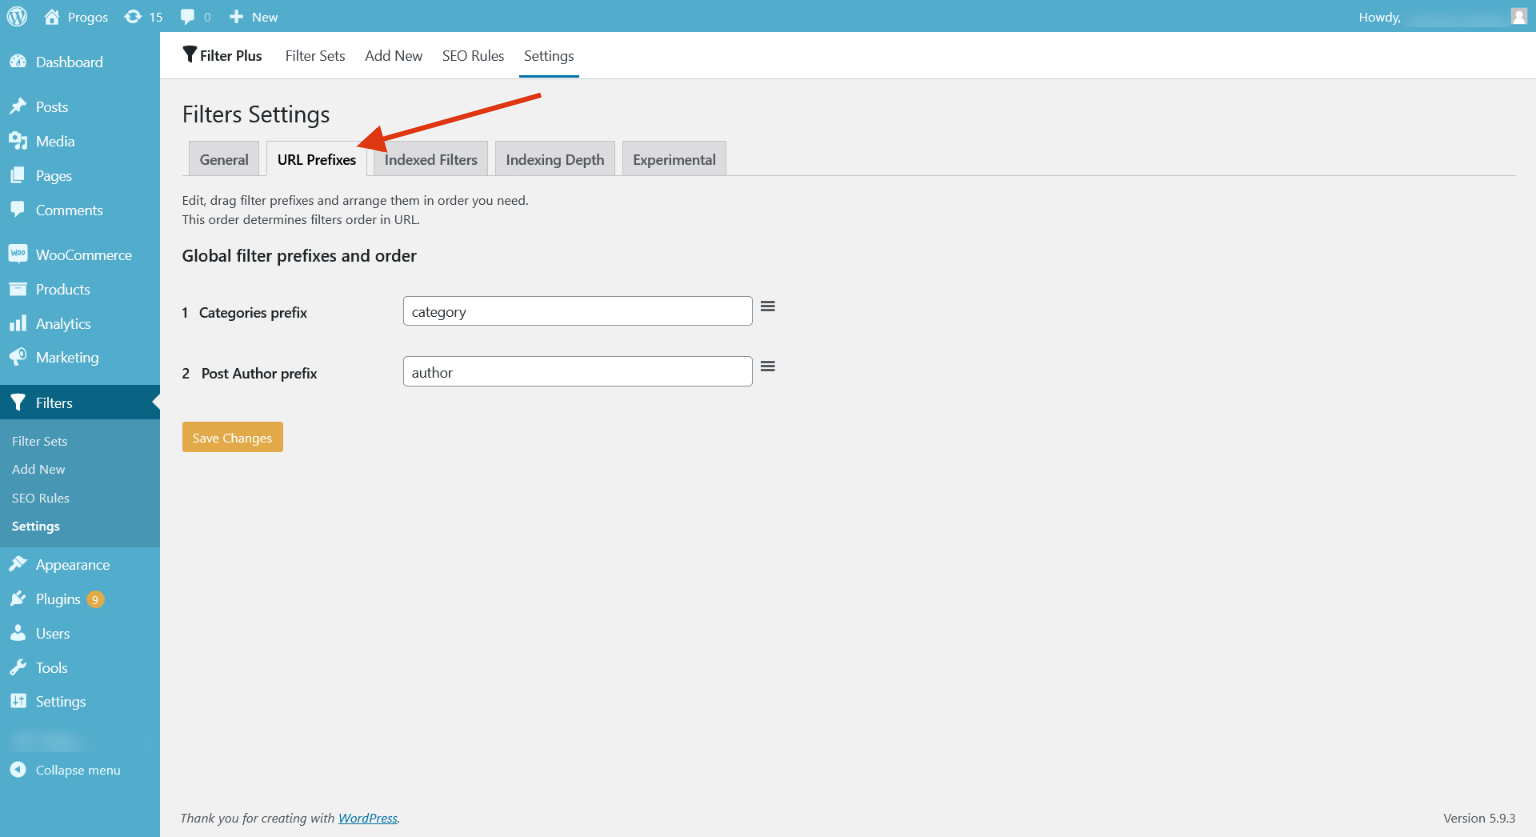
URL prefixes are something like WordPress slugs. Each Filter has its own unique URL prefix. This prefix is
displayed in each URL section, which corresponds to a separate Filter. For example for the URL path:
/color-green-or-white/size-small/ or ?color=black;red&size=large
“color” and “size” are prefixes for “Color” and “Size” Filters.You can edit values of URL prefixes for filters
and also change their order in the URL if Permalinks are enabled on your site. To change the filter sections’
order in the URL, drag and drop prefixes in the order you need and save settings.
Indexed Filters
For the SEO Rules, we need to select the checkboxes from this tab. You can specify which Filters are available
for indexing from here.
Indexing Depth
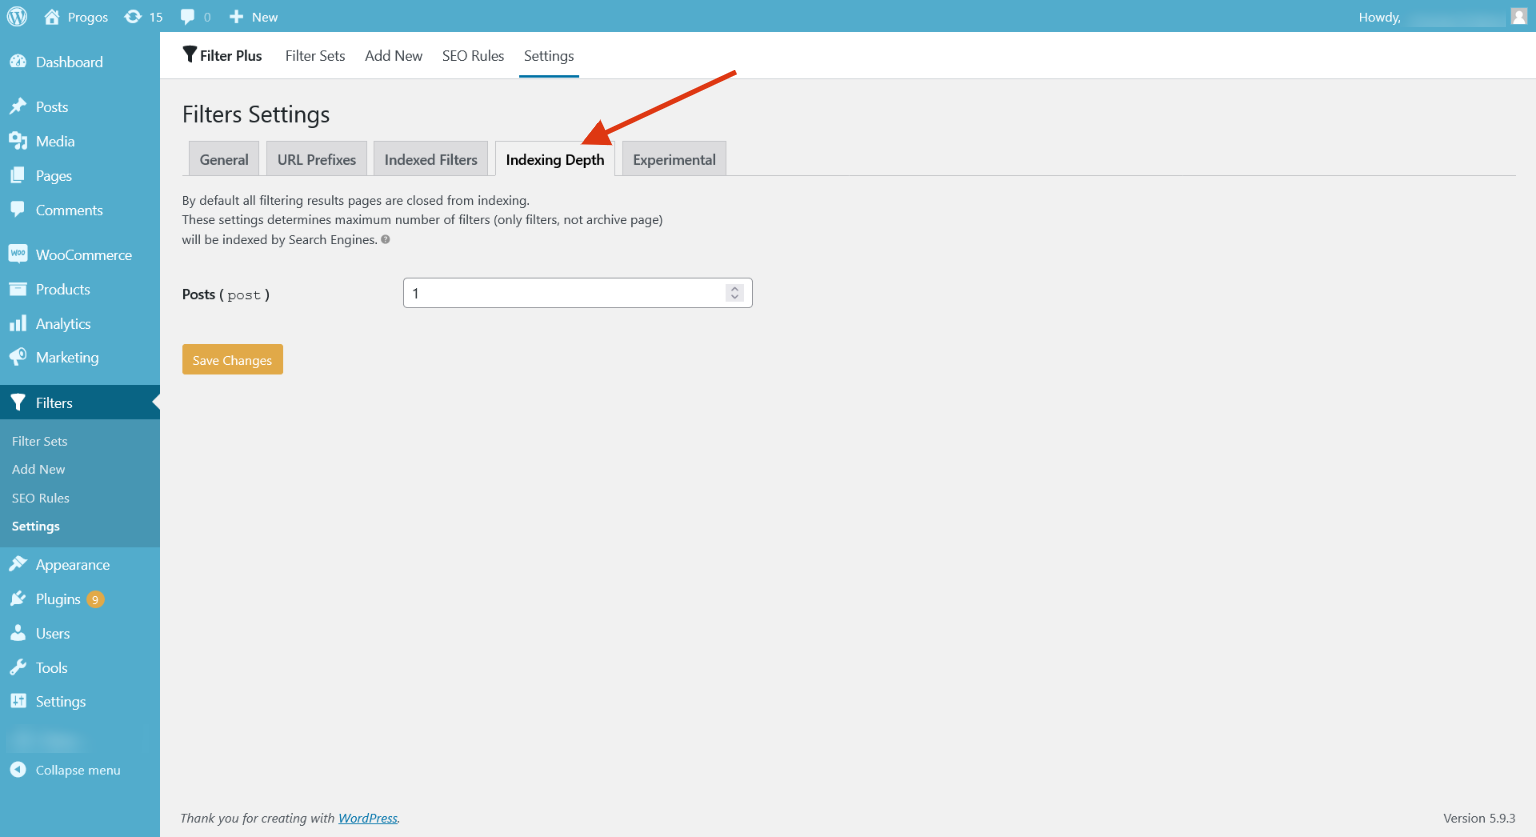
These settings determine the maximum number of filter sections in the URL, that can be indexed by Search
Engines. This value may be different for each Post type.
For example, if the indexing depth for the Post type Product is 2, it means that pages of filtering results with a
URL path:
/brand-colins/color-black/
will be available for indexing.
But pages with URL that contains three sections like this:
/brand-colins/color-black/size-large/
will no longer be available for indexing because the number of filter sections in the URL is three and exceeds
configured indexing depth limit of 2.
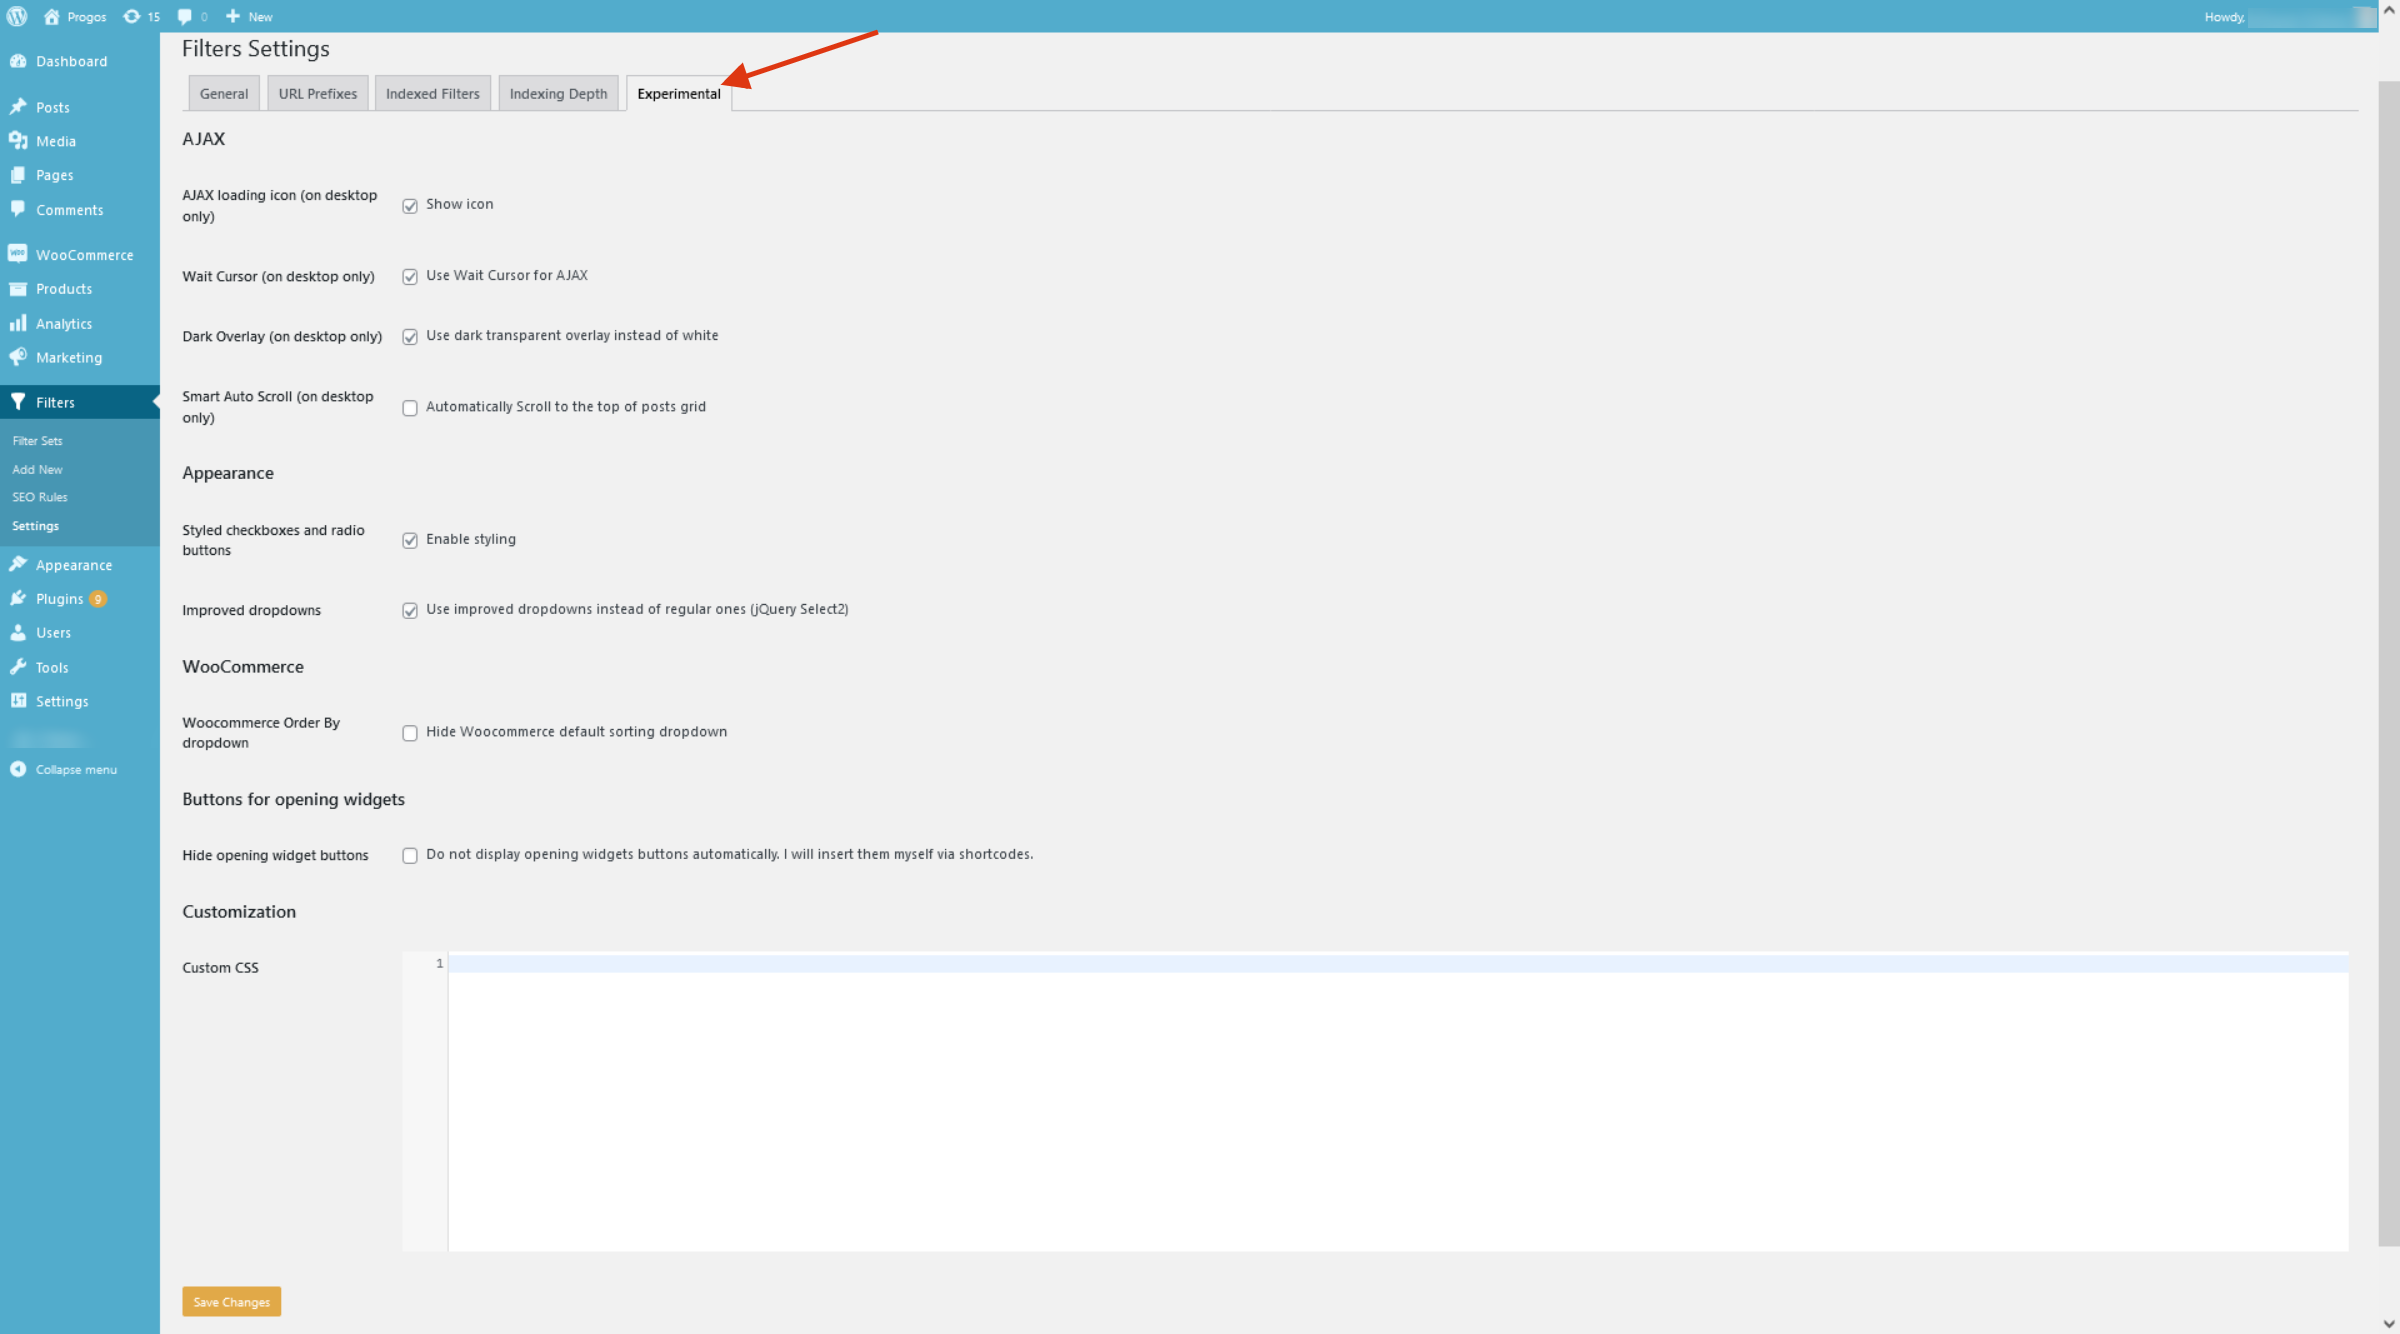
Experimetal
This settings tab is mainly related to the appearance and layout. The options are self-explanatory.
Request a Feature
Please contact our support team to request another feature or any customization.
Changelog
Version 1.0.0
* Initial Release.
Source




Reviews
There are no reviews yet.